




The Complete Guide to Create Campaign: Set Up Your Automated Blog Campaign Step by Step
The Create Campaign wizard brings your entire content automation into six steps — from content rules and publishing schedule to keywords, images, and final review. This guide walks through every step and explains what each individual field does and how to get the best results from it.
Creating a campaign in Publisha.ai is essentially building a content production line: you define in advance what the AI will write, when it will publish, which keywords it will target, and which images it will use. The wizard consists of six steps: Content Settings, Set Schedule, Prompt, Keywords, Media and Output. The progress bar at the top shows which step you are on, and you can configure every step separately for the Blog and Social tabs.
Step 1 — Content Settings
Content Settings is the first step, where you define the ground rules of your campaign. Here you set where the content will be published, how long it should be, what tone it should use, and how the SEO fields will be filled. The choices you make in this step shape every step that follows.
Select Integration
This is where you choose the platform your generated content will be sent to. Three options are offered: WordPress, Website and Shopify. A platform with a completed connection shows a green CONNECTED badge, while unconnected ones show a red marker. At least one integration must be connected before you can continue — this field is required.
Approximate Word Count
This required field sets the approximate word count of the content the AI will produce. The value is a target range rather than a hard limit; the model writes to a length close to this number. Enter a lower value for short announcements and a higher one for in-depth guide articles.
Tone of Voice
This section lets you choose the voice of your content by category. The categories at the top are All, Professional & Business, Friendly & Conversational, Marketing & Sales, Educational & Informative, Creative & Brand, Emotional & Human and Advanced. Selecting a category reveals the tones belonging to that group, and you can search for a tone using the search box in the top right. Your picks are collected in the Selected Tones area below, and Clear all removes them all at once. This field is required and has a major impact on content quality, since it defines your brand's voice.
SEO Configuration
This is where the search engine optimization settings for your content are configured. If an SEO Bridge Plugin is active, an information bar appears at the top of the section together with your site address, indicating that SEO fields will be synchronised automatically with your WordPress site. You can end the connection at any time using Disconnect.
SEO Plugin
From this dropdown you select the SEO plugin installed on your WordPress site. This choice ensures the meta fields are written to the correct plugin. Because focus keyword generation is supported across all plugins, the core SEO fields synchronise no matter which plugin you use.
AI-Assisted SEO Generation
When this toggle is on (Enabled), the Focus Keyword, Meta Title and Meta Description fields are generated automatically by AI for each post. If you turn it off, you can enter those fields manually. Leaving it on makes sense for campaigns producing large volumes of automated content, while turning it off suits individual posts where you want manual control.
Focus Keyword, Meta Title & Meta Description
These three fields determine your content's search visibility:
• Focus Keyword: the primary keyword you want the page to rank for (e.g. "content marketing strategy").
• Meta Title: the recommended length is 50–60 characters; this is the headline shown in search results.
• Meta Description: the recommended length is 150–160 characters; this is the description text in the search result.
If AI-Assisted SEO Generation is enabled, these fields fill in automatically; if it is disabled, you can write them yourself while following the character counters.
Tags
This is where you decide how content tags are determined. In Auto mode the AI produces the tags for you — in that case you enter how many tags you want (e.g. 5) in the Tag Count box. In Manual mode you define the tags yourself.
Category
Select the category the post will be published under from the dropdown. If there is no suitable category in the list, you can create a new one directly using the + New category link.
Temperature Adjust
This checkbox lets you manually adjust the AI's creativity level (temperature). Once enabled, higher values produce more varied and original text, while lower values produce more consistent and predictable text. If you leave it untouched, the default balance is used. Once this step is complete, continue with Next → Set Schedule.
Step 2 — Set Schedule
The Set Schedule step determines when and how often your content is published. Here you set the first publish time, the frequency, when the campaign should end, and the time variation that helps you avoid looking like spam.
First Publish Date & Time
This required field is the date and time your campaign's first post will go live. Open the calendar to set the date, the time, and the UTC timezone. This point is the starting reference for the entire publishing chain.
Frequency Unit
This required dropdown sets the unit for your publishing interval. The options are Minutes, Hours, Days, Weeks and Months. The unit you choose defines what the number in the next field means — for example, with "Hours" selected, entering 6 means "every 6 hours".
Hours Between Triggers
This required field is the amount of time that passes between each publish run. You enter a number in the unit chosen in Frequency Unit. This directly sets the publishing pace of your campaign.
End Condition
This dropdown determines when the campaign stops. There are three options:
• Never: the campaign runs until you stop it.
• After N runs: it stops automatically after a set number of publishes.
• Until date: it runs until the date you specify.
Lock Exact Time?
This setting decides whether publish times are fixed. There are two options: No, allow randomness (Recommended) — adds slight randomness to the times and is the recommended choice; and Yes, keep exact time — publishes at exactly the same time every run. For a natural publishing pattern, allowing randomness is the recommended option.
Time Variation (%)
Here you set, as a percentage, how much randomness is added to publish times (e.g. 20). This value adds natural jitter to the timing to help avoid being flagged as spam. It works together with Lock Exact Time set to "No" so your posts do not look machine-generated.
Indexing & Spam Notice
Indexing & spam notice: The information note shown in this step highlights an important point. If search indexing is disabled for the project (for example, meta robots=noindex or a Disallow rule in robots.txt), your posting cadence will not affect search engines. Once indexing is enabled, avoid spam-like patterns: keep intervals at 60 minutes or more (typical range: 6–24 hours), use roughly ±15–30% randomness, and maintain a steady cadence instead of bursts. You can monitor the impact through Crawl stats in Search Console.
Step 3 — Prompt
The Prompt step is where you tell the AI what to write. Here you name the campaign, select or create a prompt template, and enter the instructions that steer the direction of your content.
Campaign Name
This required field is the name you give your campaign. It only helps you distinguish campaigns from one another in the panel, but a meaningful, descriptive name makes life much easier once you manage many campaigns.
Prompt Name
This required field is the name you give your prompt template. You can select an existing template or create a new one if needed. Well-named templates let you reuse the same prompt across different campaigns.
Show System Prompt
The Show System Prompt + link reveals the hidden system prompt. The system prompt is the high-level instruction that governs the AI's overall behaviour and rules; advanced users can edit it here for finer control over the model's output.
User Prompt
This is the main text area where you write the actual subject of the content and what you want from it. Enter what the article should be about, which points it should cover, and any special instructions you have. The clearer and more detailed you are, the more accurate the output will be.
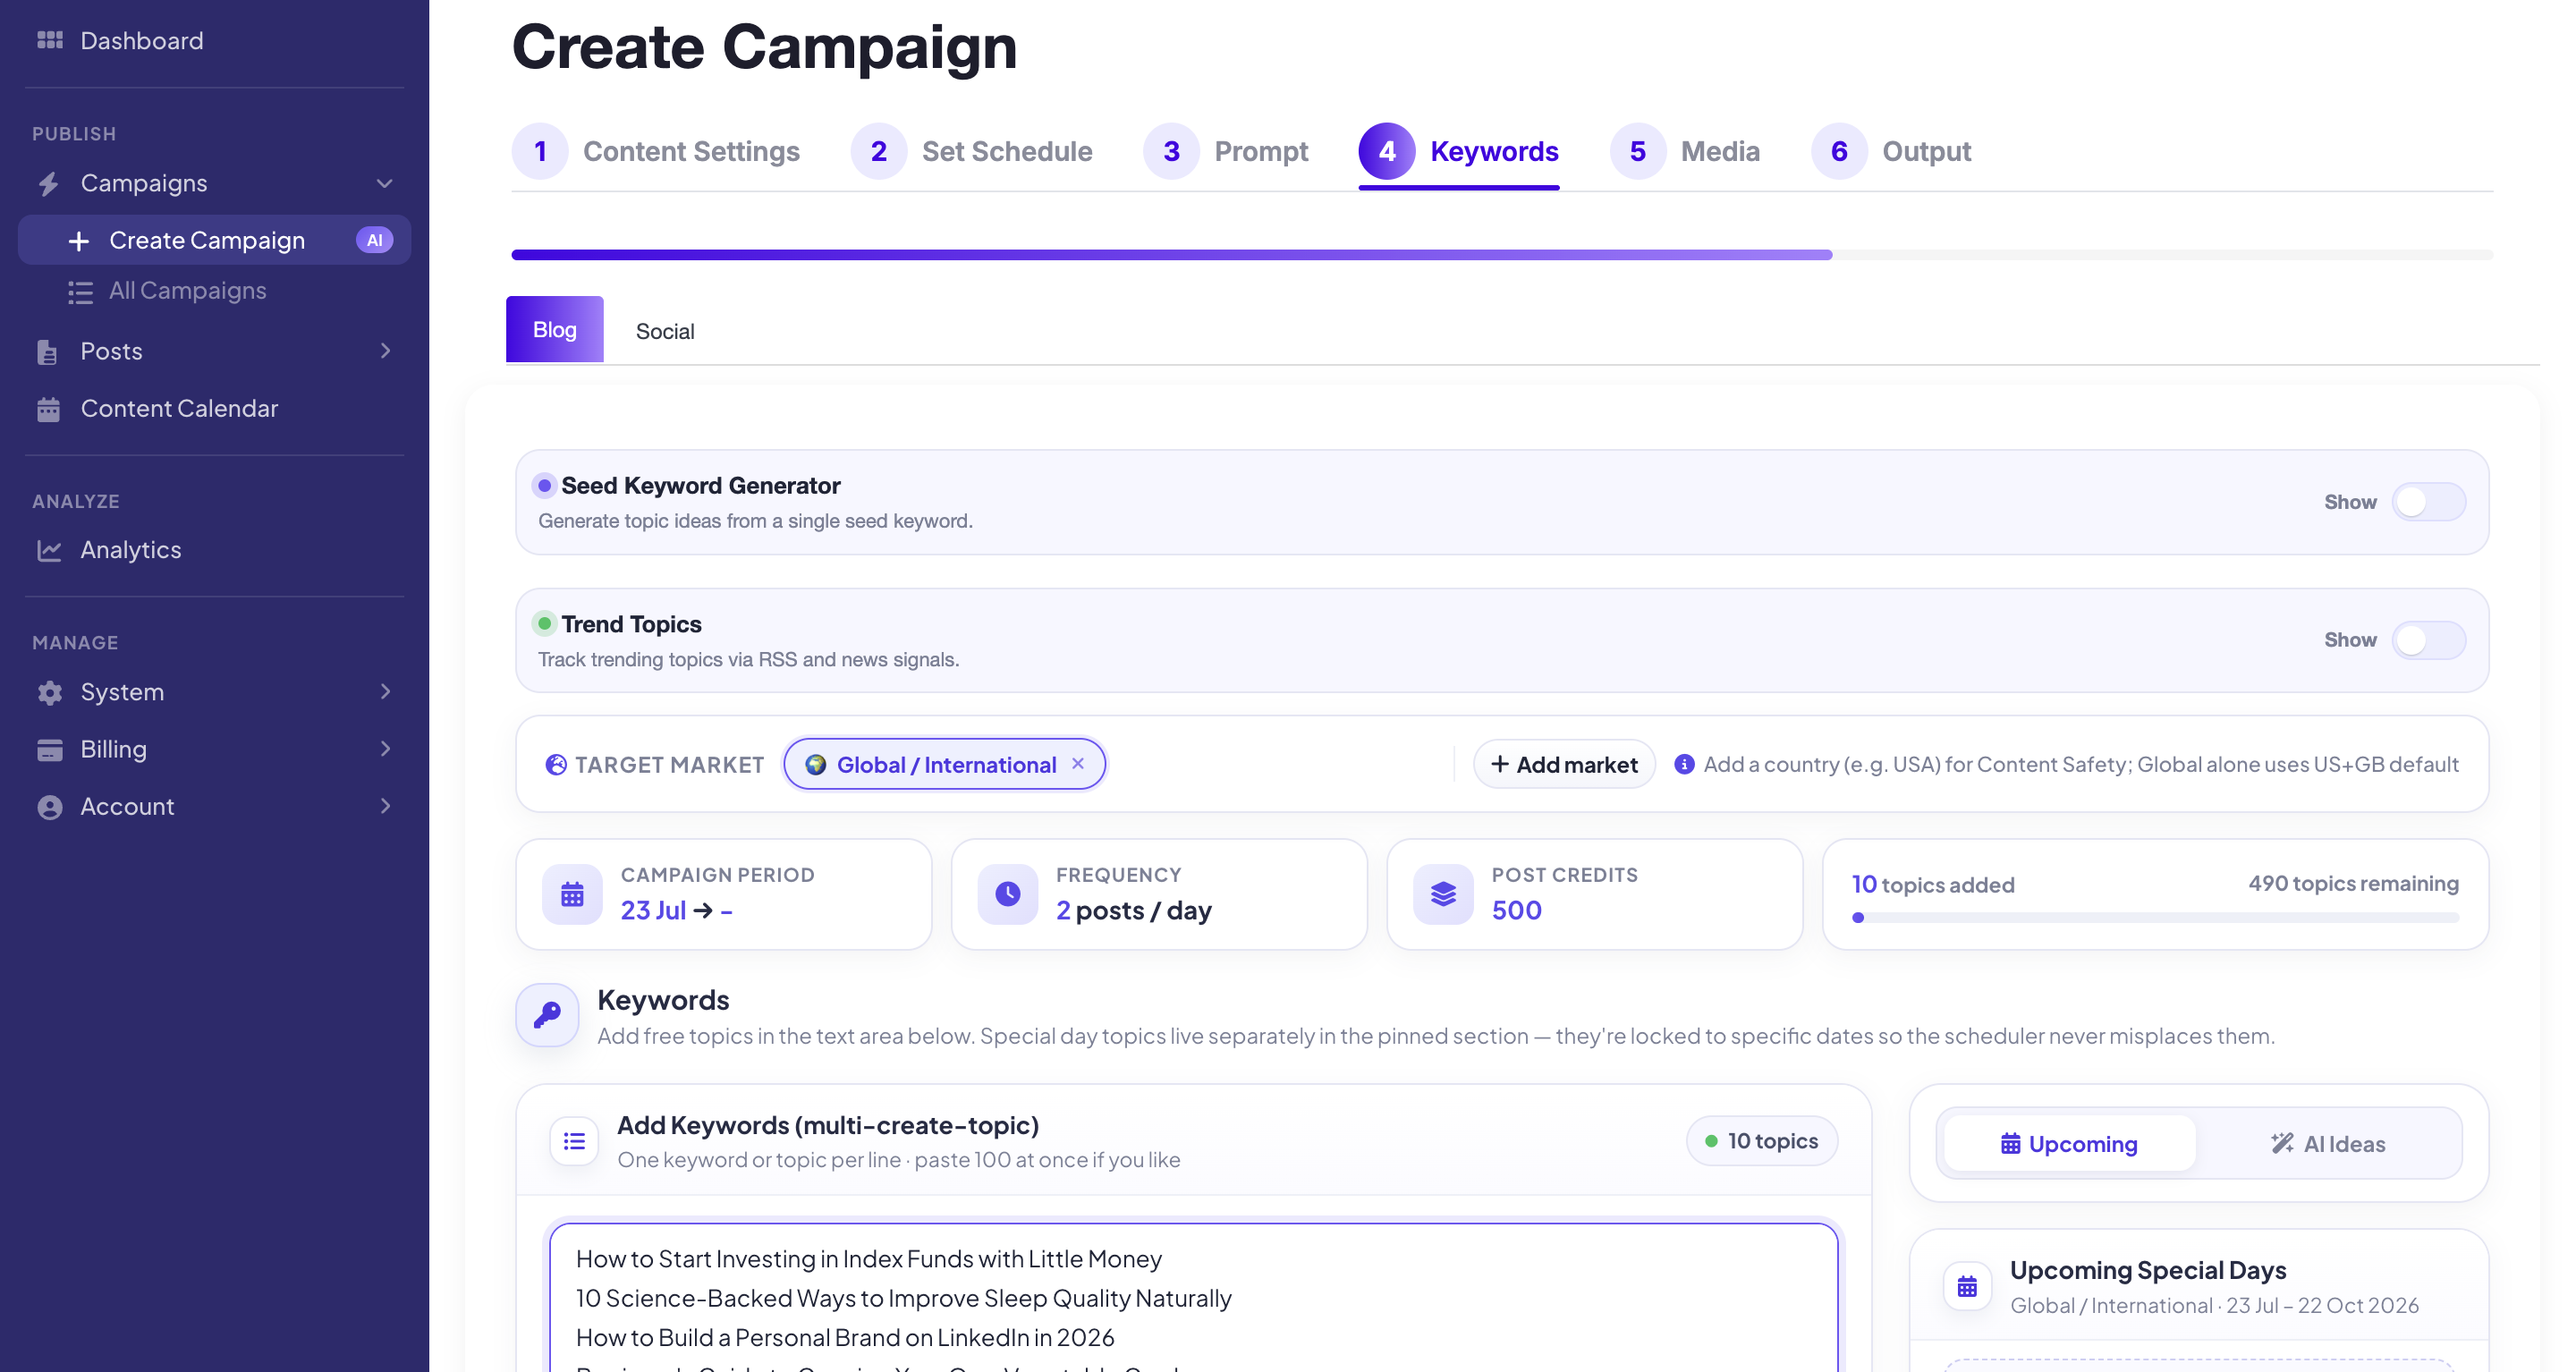
Step 4 — Keywords
The Keywords step determines which topics and keywords your content will be built around. You can add topics one by one, get ideas from the AI, or use "special day" topics that are pinned to specific dates.
Seed Keyword Generator
This tool generates topic ideas starting from a single seed keyword. You can turn it on and off with the Show toggle on the right. It is ideal for building a broad pool of topics when you are not sure where to start.
Trend Topics
This module tracks trending topics via RSS and news signals, and is also enabled with the Show toggle. It is useful for campaigns that aim to produce timely, on-trend content.
Target Market
This is where you select the markets your content targets (for example, Turkey and Global / International). You can add new markets with + Add market. This selection filters the special day suggestions in particular — meaning the "special days" you are offered are shaped by your target market.
Campaign Period, Frequency & Post Credits
This step displays summary cards for your campaign:
• Campaign Period: the start and end date range of the campaign (e.g. 5 Jun → 12 Jun 2026).
• Frequency: the publishing pace you set (e.g. 2 posts per day).
• Post Credits: your remaining content credits (e.g. 748). The counter beside it shows how many topics you have added and how many credits are left.
Add Keywords (multi-create-topic)
By writing one keyword or topic per line in the text area, you can add many topics at once — you can paste up to 100 in one go. The examples inside the field show what kind of entries are expected (e.g. "Weekend sale — 20% off all products", "New spring collection launch"). You add your entries to the list with + Add.
Pinned to Specific Dates
This section lists topics that are pinned to specific dates. Special day topics land here and are locked to their date, so the scheduler never places them on the wrong day. You can clear these pinned topics with Clear all.
Upcoming Special Days & AI Ideas
The Upcoming tab in the right-hand panel lists upcoming special days relevant to your target market (e.g. "International Day against Illegal Fishing"). Ready-made topic suggestions are offered for each special day, and you can add them one at a time or use Add all to auto-pin them all to their dates. The AI Ideas tab offers additional topic ideas generated by AI.
Step 5 — Media
The Media step is where you configure the images added to your content. Here you determine where images come from, what kind of image is used, and which keywords they are searched with.
Media Source
This dropdown sets how images are sourced. There are three options: None (use no images), Auto Search (automatic search) and Manually Add (add the images yourself). For automated production, Auto Search is the most practical option.
Media Type
This determines how the image is used within the content. With Cover Image selected, the image is used as the cover (featured) image; with Media in Content, images are placed inside the body of the article.
Image Source
This menu is where you choose the source your images are pulled from. The options are Pexels.com, Unsplash.com, Pixabay.com and Create AI Image (generating images with AI). The stock platforms offer royalty-free images, while Create AI Image lets you produce original visuals.
Search Image With
This sets the criterion used to search for images (e.g. Keyword for keyword-based search). Just below it, the "Using these keywords" section shows which keywords are currently being used for the image search (for example, "book" and "house").
Compression & Resize
This is an optional section, opened with the Show toggle. It is where you configure image compression and resizing. If you leave it empty, your Global Settings are used; if Global Settings are also off, no compression is applied. Use this section if you want to optimise images for page speed.
Image Description
This section, recommended for SEO, lets you add image descriptions (alt text) and is opened with the Show toggle. Adding descriptions to your images improves both accessibility and your performance in image search.
Match Images to Your Content
This is the image pool (Image Pool) where you match a suitable image to each keyword. Your keywords are listed on the left (e.g. "book", "house"), and the image options for that keyword appear on the right. Shuffle reshuffles the images, Auto-Match matches them automatically, and Add More Images adds more images to the pool. The "Keywords Matching" bar at the bottom shows your match rate (e.g. "100% — 2 of 2 keywords with cover image"), so you can confirm every keyword has an image.
Step 6 — Output
Output, the final step, is where you review all your selections before queuing the campaign. Here you confirm that everything is correct and then either save the campaign as a draft or add it to the publishing queue.
Output Preview
This shows a summary of your campaign on a single screen: Campaign, User Prompt, System Prompt, Keywords, Template, Tone, Word Count and Schedule. If any field is missing or looks wrong, you can go back and correct it using Back.
Save as Draft & Save & Queue
You have two publishing options:
• Save as Draft: saves the campaign as a draft. Use this if you want to store it for later editing without starting it yet.
• Save & Queue: saves the campaign and adds it to the publishing queue. Once you choose this, content generation and publishing begin according to the schedule you set.
Once you complete this step, your automated blog campaign is ready to run.
Frequently Asked Questions
Can I edit a campaign later?
Yes. By saving the campaign with Save as Draft, you can return at any time and reconfigure the steps. The Back button in the Output step also lets you move back to previous steps.
What should my publishing interval be?
To avoid looking like spam, it is recommended to keep intervals at 60 minutes or more; the typical range is 6–24 hours. You can also make your publishing pattern more natural by adding roughly ±15–30% randomness with Time Variation.
Should I fill in the SEO fields manually?
That is up to you. With AI-Assisted SEO Generation enabled, the Focus Keyword, Meta Title and Meta Description are generated automatically. If you want full control, turn the option off and enter the fields yourself.
Do I have to use images?
No. You can produce content without images by selecting None under Media Source; alternatively, you can add images automatically via Auto Search from Pexels, Unsplash, or Pixabay, or have AI generate them with Create AI Image.
1 Comment

ScottSnuff
August 26, 2026 at 04:58 AMСбор качественных хрумер ссылки <a href=https://www.olx.ua/d/uk/obyavlenie/progon-hrumerom-dr-50-po-ahrefs-uvelichu-reyting-domena-IDXnHrG.html>https://www.olx.ua/d/uk/obyavlenie/progon-hrumerom-dr-50-po-ahrefs-uvelichu-reyting-domena-IDXnHrG.html</a> помогает повысить видимость сайта и улучшить его позиции в поиске.
Leave a Reply
Your email address will not be published. Required fields are marked *